CORA™ Online Help
Caution: If you leave a request by going to another page—that is, by clicking on any tab in the top navigation bar except Help—you will lose any unsaved changes to the form you were editing. Otherwise, changes are saved after any action you perform on the form.
You can edit any unsubmitted request. You cannot edit submitted requests; however, you can supplement accepted or confirmed requests. (See Supplementing a Request.)
Click the Unsubmitted tab.
Search for the request you want to edit. (See Searching for a Request.)
Click the request's PON. The ASR form for the request displays in view-only mode.
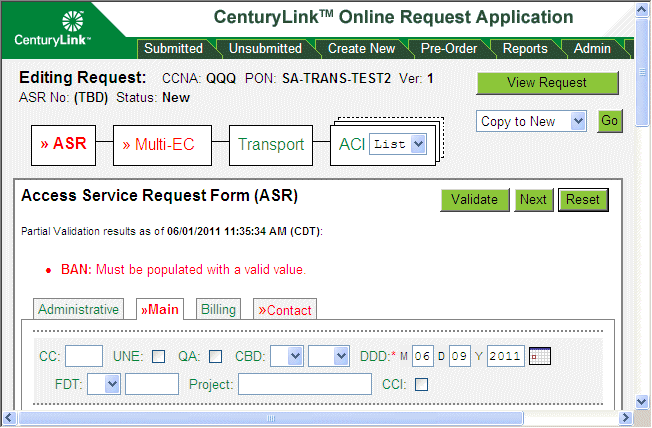
Click Edit Request. The ASR form for the request displays in editing mode. Partial validation results display as well as the date, time, and time zone the results were generated.

Fill out and edit the ASR form appropriately (or you can work on other forms first — see Using the Form Flow Diagram and Using the Validate, Next, and Reset Functions for more information). Be sure to fill out information in each of the ASR form tabs (Administrative, Main, Billing, and Contact). Some information is filled in for you automatically.
Note: You can edit all fields unless they are greyed out, even those automatically filled in for you.
Note: To undo unsaved changes in the form or tab you're on, click Reset. In the message that appears, click OK.
If you want to save some or all of the ASR contact information for future requests, select the appropriate check boxes at the bottom of the Contact and Billing tabs on the ASR form. (You can still edit any auto-filled information.)
Check boxes at the bottom of the Contact tab:

Check box at the bottom of the Billing tab:

When you have finished filling out a form in the request, perform one of the following actions:
Navigate to another form in the form flow. You can either click Next to navigate to the next form in the form flow or click the specific form you want to navigate to in the form flow diagram. See Using the Form Flow Diagram and Using the Validate, Next, and Reset Functions for more information.
Important: Your work is saved but forms are NOT validated for errors when you navigate to another form in the form flow using either of the above two navigation methods. Existing errors remain as is and are not refreshed.
Validate all forms in the form flow. Click Validate.
Note: Validation is performed on ALL information entered so far and not just on the form where Validate was clicked. You will remain on the same form whether or not there are errors. If you want to navigate to another form in the form flow after validation, perform one of the steps listed in the first bullet in step 6.
Add any child and multiple forms to the request as needed. See Adding Child Forms and Adding Multiple Forms.
Complete all forms for the request using the steps in this topic for guidance. Be sure to fill out information in all tabs for forms. See Additional Form Features and Behaviors for information about additional features in some forms.
Submit the request. See Submitting a Request.