We no longer support this browser. For an optimal experience, we recommend updating your browser.
How to use Connected Voice
Learn how to use all the options and features of Connected Voice from CenturyLink.
The basics
Making a call from your Connected Voice service is the same as placing a call from a traditional phone line. Simply pick up your handset and dial the number. Your call will be connected.
Receiving a call on your Connected Voice service is also the same as taking calls on a traditional phone line. When a call comes in, all handsets that are connected through your Connected Voice adapter will ring. Simply answer the phone.
You can manage, activate, and deactivate the following features directly from your phone.
DN = destination number
| Calling Feature | Manage |
Activate/ Enable |
Deactivate/ Disable |
|---|---|---|---|
Accept All Calls (not otherwise restricted by other features) |
*64 | *74 | |
Anonymous Call Rejection |
*77 | *87 | |
Anonymous Call Reject with Intercept |
*95 | *99 | |
Call Back (Last Call Return) |
*69 | ||
Call Forwarding All |
*72 | ||
Call Forwarding on Busy |
*90 | ||
Call Forwarding on No Answer |
*92 | ||
Call Forwarding on Unregistered |
*94 | ||
Call Trace |
*57 | ||
Call Waiting |
*43 | *44 | |
Caller Block/Allow (for specific caller) |
*59 | *60 | |
Caller Block with Intercept (for specific caller) |
*58 | ||
Caller ID Block |
*31 | ||
Caller ID Block (per call) |
*67DN | ||
Caller ID Un-Block (per call) |
*82DN | ||
Caller Forward (for specific caller) |
*63 | ||
Directed Call Pick Up |
** | ||
Direct To Voicemail |
*00 | ||
Do Not Disturb |
*96 | *97 | |
Dynamic Block List (add last caller to block list) |
*60 to block caller | *80 to allow caller | |
Group Pick Up |
*40 | ||
Park Call |
*62 | ||
Park Call Retrieval |
*66 | ||
Voicemail |
*98 |
Your Connected Voice service includes long distance calling.
You get unlimited calls to the U.S. and territories:
- Alaska
- Hawaii
- Puerto Rico
- US Virgin Islands
Plus 500 direct-dial international minutes each month to the following countries:
- Canada
- Germany
- Ireland
- Mexico
- United Kingdom
Once the 500 minutes have been used, any future calls to the countries listed are unavailable until the minutes are reset on the first of the next month.
You can send and receive faxes on your Connected Voice Basic service. See step-by-step instructions for how to do this.
Voicemail and calling features
1. Access your mailbox: To set up your voicemail, press *98 from your Connected Voice phone, or call your 10-digit Connected Voice number from another phone.
This is also how you can access your mailbox to check messages or make changes at any time. Voice prompts will guide you through the steps.
If it's your first time accessing your Connected Voice voicemail, the temporary PIN is 1234.
2. Create your PIN: It can be any number between 4 and 15 digits. Make note of it, as you'll need it to access your messages in the future.
3. Record a name to identify your mailbox.
4. Choose a greeting: You can record your own or use one of the built-in greetings.
- Press 1 to select the standard greeting with phone number: "At the tone, please record your message to [phone number]."
- Press 2 for the standard greeting with your name as you recorded it in step 3: "At the tone, please record your message to [name]."
- Press 3 to record a personalized greeting, up to three minutes long. For example: "You've reached the Parks. You know what to do at the beep."
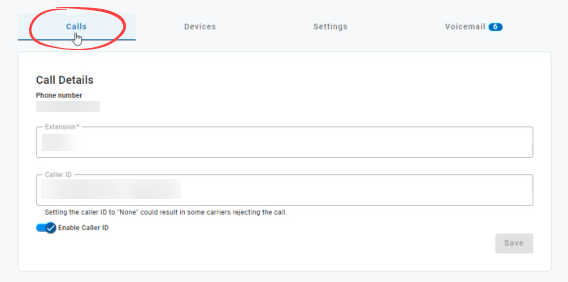
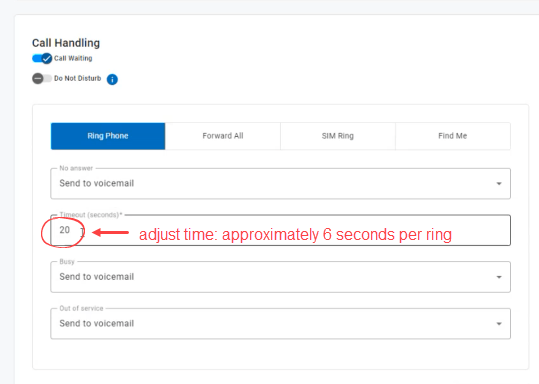
Sign in to your Connected Voice account. To adjust number of rings, go to your Users section, then click on Calls.
Scroll down to the Call Handling section. Instead of using number of rings, the sytstem follows a timeout rule in seconds. Each ring cycle is approximately 6 seconds. Set the Timeout number according to these guidelines:
1 ring = 6 seconds
2 rings = 15 seconds
3 rings = 20 seconds
4 rings = 25 seconds
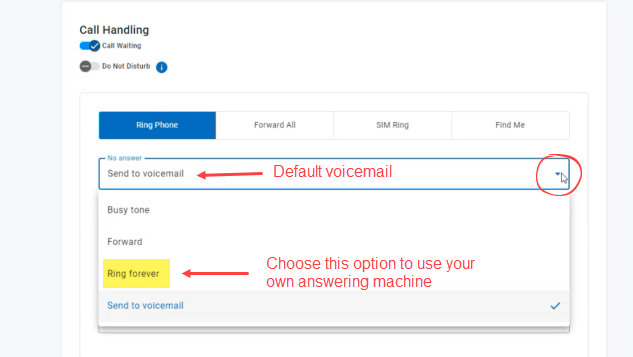
Sign in to your Connected Voice account. To change the action taken when you don't answer your phone, go to the Users section, then click on Calls.
Scroll down to the Call Handling section. Select the drop-down next to "No answer." The default setting is "Send to voicemail" but you can select Ring forever to bypass the system voicemail. This allows you to have no voicemessaging service, or to use your own answering machine.
You can manage, activate, and deactivate the following features directly from your phone.
DN = destination number
| Calling Feature | Manage |
Activate/ Enable |
Deactivate/ Disable |
|---|---|---|---|
Accept All Calls (not otherwise restricted by other features) |
*64 | *74 | |
Anonymous Call Rejection |
*77 | *87 | |
Anonymous Call Reject with Intercept |
*95 | *99 | |
Call Back (Last Call Return) |
*69 | ||
Call Forwarding All |
*72 | ||
Call Forwarding on Busy |
*90 | ||
Call Forwarding on No Answer |
*92 | ||
Call Forwarding on Unregistered |
*94 | ||
Call Trace |
*57 | ||
Call Waiting |
*43 | *44 | |
Caller Block/Allow (for specific caller) |
*59 | *60 | |
Caller Block with Intercept (for specific caller) |
*58 | ||
Caller ID Block |
*31 | ||
Caller ID Block (per call) |
*67DN | ||
Caller ID Un-Block (per call) |
*82DN | ||
Caller Forward (for specific caller) |
*63 | ||
Directed Call Pick Up |
** | ||
Direct To Voicemail |
*00 | ||
Do Not Disturb |
*96 | *97 | |
Dynamic Block List (add last caller to block list) |
*60 to block caller | *80 to allow caller | |
Group Pick Up |
*40 | ||
Park Call |
*62 | ||
Park Call Retrieval |
*66 | ||
Voicemail |
*98 |
Additional features on Connected Voice Professional
These functions are only available for the Professional version.
There are two ways to save voicemail messages:
1) Download after you receive them
2) Set all voicemail to be forwarded to email
For both options, the first step is to sign in to your Connected Voice account.
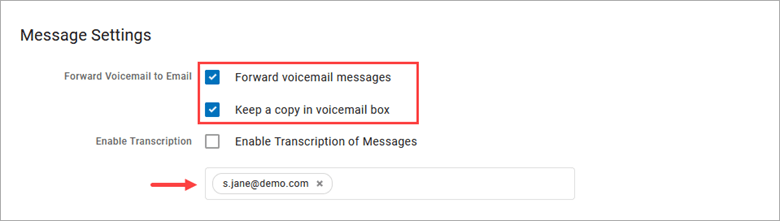
How to set up voicemail to email forwarding
This will send all new messages to your email.
- In Message Settings, check Forward Voicemail to Email.
- You can also choose to Keep a copy in voicemail box. When this is checked, the message waiting indicator (MWI) on your device will stay on until you've listened to or deleted the message from your voicemail box.
- Enter one or more email addresses, each separated by a comma.
- Click Save.
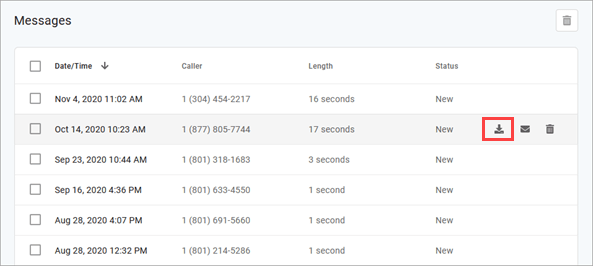
How to download voicemail messages
This will allow you to save your voicemail on your computer.
- In Messages, hover over the voicemail you want to download.
- The download icon will appear.
- Click the download icon.
The Call History section holds the records of all calls made and received on the account. Calls are presented in chronological order with the most recent call at the top.
To save your call history for future reference, click the download CSV option on the right.
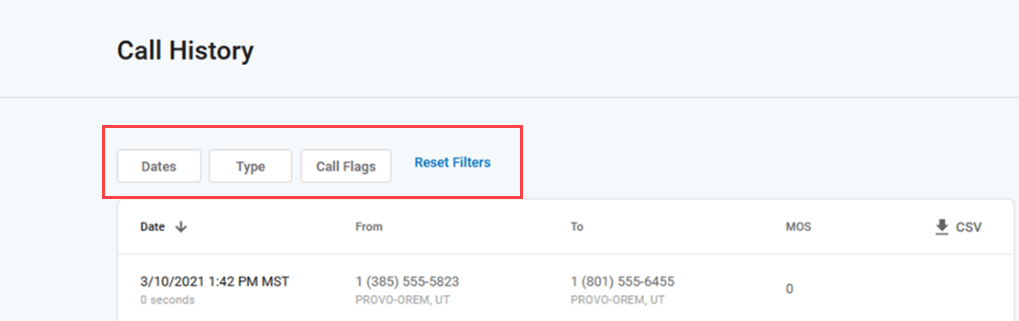
Filters
If you do not want to export ALL the calls on your account, you can use filters (outlined in red in the image above) to find and export the ones you want. Call records can be filtered by date, type (inbound or outbound), and/or call flags (answered, busy, fowarded, missed, sent to VM).
Click the filter buttons to set your criteria. If necessary, click "Reset Filter" to remove any parameters and display ALL calls again. Once your parameters are set, you can click the download CSV option on the right.
Top Internet Topics
-
Check for an outage -
Troubleshooting slow internet -
Speed hub -
Upgrade your service -
WiFi support -
Internet security
View all Internet topics
Top Tools
Was this information helpful?
Support topics
About Lumen | About CenturyLink | Careers | Investor Relations | Newsroom | Legal | Privacy Notice | Tariffs | Customers with Disabilities | Site Map | Cookie Settings | CenturyLink in Your Area | CenturyLink.net | Quantum Fiber in Your Area | White/Yellow Pages | Centurylink Retailer
Residential | Small Business | Enterprise | ©2025 CenturyLink. All Rights Reserved.