We no longer support this browser. For an optimal experience, we recommend updating your browser.
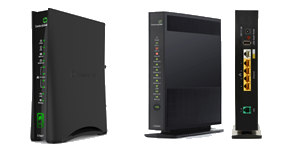
CenturyLink tower modem setup
Do you have a tall, black modem from CenturyLink? Learn how to install your modem and start up your internet service. Learn what to do before installation, then follow the steps to finish setup and get online. You can also watch a video about how to set up your modem.
This page applies to all of our tower modems (a black box or tower). If you have a white C4000, go to this setup page instead.
The instructions below are for CenturyLink tower modems. This includes all modems except the C4000 series and C5500 SmartNID.

Getting ready for installation
Have you ordered new internet service or a new modem from CenturyLink with standard installation? There are some things you need to know before completing the installation process. For the best results, read the full instructions below before you begin.
Your modem will arrive in the mail on or before the date your service is scheduled to start. Look for an email with your order confirmation details and an order status tracking link. Your line should be activated no later than 7 p.m. on your start date. You may receive a notification earlier in the day to let you know that your service has been activated, and then you can start your installation. If in doubt, you may want to wait until 7 p.m. to hook up your modem.
Installation guide (PDF)
We recommend downloading and installing the My CenturyLink app on your iOS or Android device to complete installation. It not only makes the setup process a breeze, but is also great for managing your CenturyLink services, billing and support going forward.
Download the My CenturyLink app
If you don't want the app, you can use a web browser on your computer to complete installation. Just follow the QuickConnect instructions when you get to step 4.
Video: Set up a tower-style modem
Please note that the modem shown in the video below may look slightly different from yours, but the steps will be the same.
Steps to complete setup
Start by unpacking the box and identifying all the pieces:
- Modem
- Power cord (black)
- Ethernet cables (yellow/white)
- DSL cable (green) - Not used with fiber modems
Next, find a good spot for your modem. Depending on the location of your active internet jack(s), you may have multiple options, or you may be limited to one room. Still, the exact placement has an impact on wireless performance and speeds you'll get on your various devices.
- Find a place where the modem will have space around it and be as centrally located as possible.
- Avoid closets or other closed-off areas to get a strong wireless signal.
- Choose a place with good air circulation that doesn't get too hot, as excessive heat can cause electronics to perform poorly.
- Don't place the modem close to other electronics, solid appliances, or fish tanks.
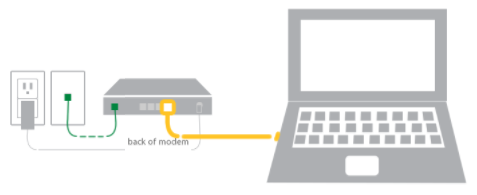
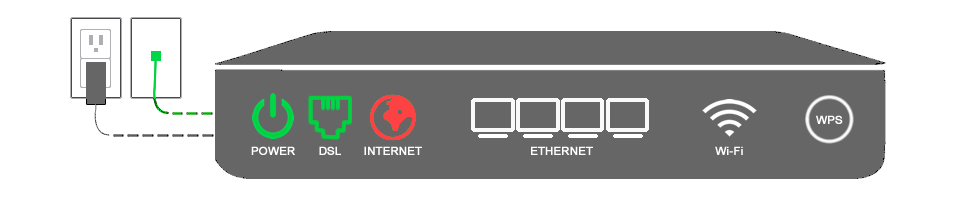
Now it's time to get your modem hooked up.
- Plug the black power cord into a wall outlet and into the power port on the back of the modem.
- Plug one end of the green cord into the green DSL port on back of the modem, and the other end into a working phone jack.
- Finally, plug one end of the yellow Ethernet cord into one of the Ethernet ports on the modem, and the other end into your computer's Ethernet port.
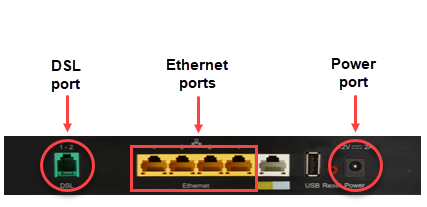
Note: Your modem may look different from the one in the image, but the ports on any tower or box-style modem will be similar.
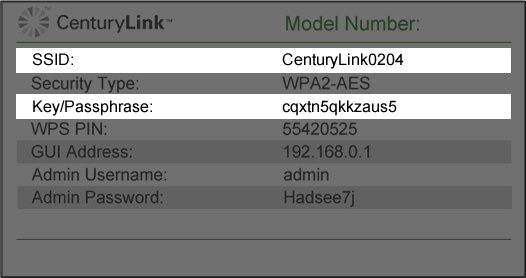
No Ethernet port on your device? If you're using a tablet or a newer laptop, you might not have an Ethernet port on your device. That's okay. If you finish your setup through the app (connecting through mobile data), then you'll be able to connect to WiFi using your WiFi network (SSID) and password printed on the modem label.
Do you have both Internet AND Home Phone service from CenturyLink?
If YES, then you must have DSL filters or splitters installed on your phone lines. Open the instructions below. Skip this step if you do not have CenturyLink home phone service.
If you have both landline phone service (not VOIP) and high-speed internet, you will need to install DSL filters on all of your phone cords. These are essential to make sure you get the best phone and internet connection.
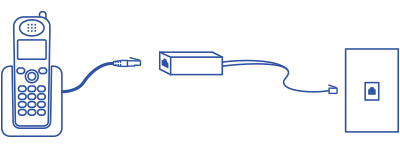
Plug the phone cord into a filter and then into the wall jack
Note: If you have cordless phones, you only need to install a filter on the phone base that plugs in to the wall jack; no filters are needed on the cordless units that only plug into an electrical outlet.
Do not install a filter between the modem and the wall jack.
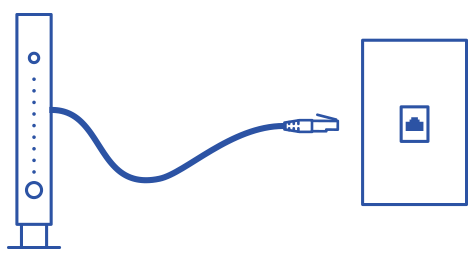
The DSL cord from the modem to the jack should not have a filter
As an alternative, use a splitter to plug both a phone and a DSL modem into one wall jack.

Use a DSL splitter to plug a phone and a modem into one wall jack
Have a home security system? Chat with customer service to get a technician to install a whole-home filter on the line outside your home (there is an installation fee for this.)
Filters are not included in your modem kit. If you have a landline phone and internet with CenturyLink, filters should have been included at the time of your order and will arrive in a separate package. If you did not receive filters, please chat with us.
Once the light on the front is blue (and the DSL light on the back, if you have one, is green), it's time to activate your service. You can do this using the mobile app OR the QuickConnect site on a browser — either one will walk you through the steps to sign your subscriber agreement, finish installing service, and create your personal network.
Option 1: On a smartphone connected to mobile data, open the My CenturyLink mobile app, go into the Install My New Modem section.
Option 2: Plug a computer into your modem directly with an Ethernet cable. Open a web browser and type in to http://connect.centurylink.com (not "https"). Follow the steps to complete the installation process using QuickConnect.
The lights on your modem will change during the installation process, to show you its connection status. Your modem may look different from the one in the images below, but the lights will function in the same way.
Once you've completed the activation process through the app or the QuickConnect site, check the INTERNET light.
If the internet light is GREEN
Success!
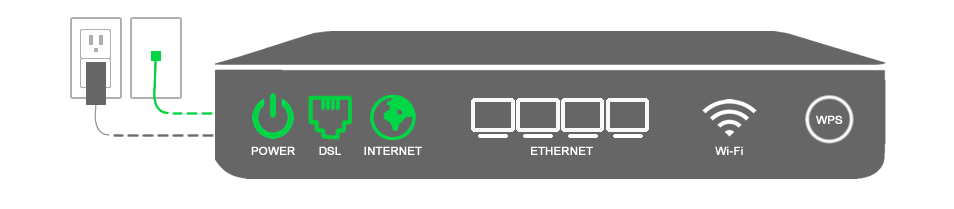
A green internet light means you're connected and can get online.
If the internet light is AMBER
You still need to finish online activation.
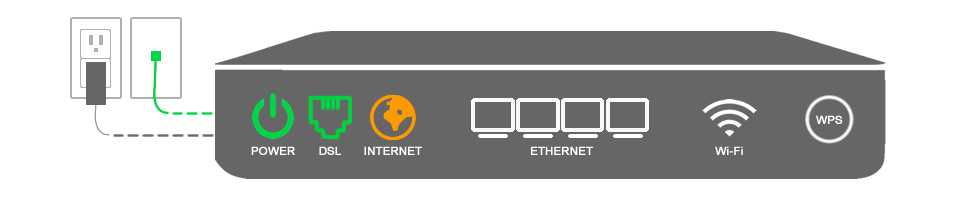
An amber (orange) internet light means the setup process is not yet complete, or you haven't accepted the user agreement. Use the mobile app or browse to http://connect.centurylink.com and follow the prompts to finish this step.
If the internet light is RED
An error has occurred.
A red internet light means a connection failure has occurred. Try disconnecting everything (DSL and power cords), waiting a few minutes, and repeating the steps above to Plug in cords and to Activate your service online. If the internet light is still red after trying again, you will need to chat with an agent to get more troubleshooting help.
Learn more about how to read the lights on your modem to troubleshoot your internet connection.
CAUTION! Do not remove your modem sticker. It includes your default Admin Username and Admin Password, which cannot be retrieved if lost. Your modem could become unusable without them.
Setup FAQs
Below are some of the most common questions that come up during the modem setup process.
The initial boot-up can take up to 15 minutes, as the modem installs firmware updates and syncs with our network. The remaining steps will depend on your installation method (the app or the QuickConnect site) and how quickly you go through it. It's a good idea to allow at least 45 minutes to complete setup. Some people may need more or less time than that.
This will depend on the age of your home or apartment and how it was built. In an older and larger home, there may be multiple jacks. In some cases, different providers may have installed jacks over the years. One or more of your jacks should be connected to the CenturyLink network; if not, you'll need to set up a technician appointment to install or activate a jack for you.
If none of the lights are coming on, this most likely means the modem isn't getting power. Check your connections and your power outlet:
- Make sure the power cord is fully and firmly plugged in on both ends: into the power port on the modem and into the wall outlet.
- Make sure the outlet is live. You can test this by plugging in another electrical device, and/or try another outlet.
A red DSL light means the modem isn't connecting to the CenturyLink network. This can be because the service hasn't been activated yet, or there's an issue with the jack or the modem configuration. You can try these steps to troubleshoot:
- Check your order confirmation to make sure you've got the right date. Wait until 7 p.m. on the service start date to attempt setup, unless you receive an email before that saying that service is ready and active.
- Try another phone jack in your home if one is available.
- Try rebooting the modem. Unplug everything, wait a few minutes, then plug it in again. This can often resolve a connection issue by clearing the memory and allowing a clean boot-up.
If the problem continues, you will need to call or chat with tech support to get further help.
If you need additional support with setting up your modem, chat with us. We're here to help!
Modem setup topics
Starting new service? Please note that a phone jack is required to set up CenturyLink internet service in your home. If you don't have a jack, chat with us to have one installed.
Top Tools
Browse news, entertainment, weather, and more.
Was this information helpful?
Support topics
About Lumen | About CenturyLink | Careers | Investor Relations | Newsroom | Legal | Privacy Notice | Tariffs | Customers with Disabilities | Site Map | Cookie Settings | CenturyLink in Your Area | CenturyLink.net | Quantum Fiber in Your Area | White/Yellow Pages | Centurylink Retailer
Residential | Small Business | Enterprise | ©2025 CenturyLink. All Rights Reserved.