The advanced setup area of your modem GUI gives you greater control over your modem's operation. These settings are best for tech-savvy folks who understand a bit more than the typical user about modems and networking.
How to access the Advanced Setup menu
Note: Your modem settings may appear slightly different from the images below, but the steps will be the same.
1. Connect a device to your network over WiFi or using an Ethernet cable connected to your modem. This works best on a tablet or computer.
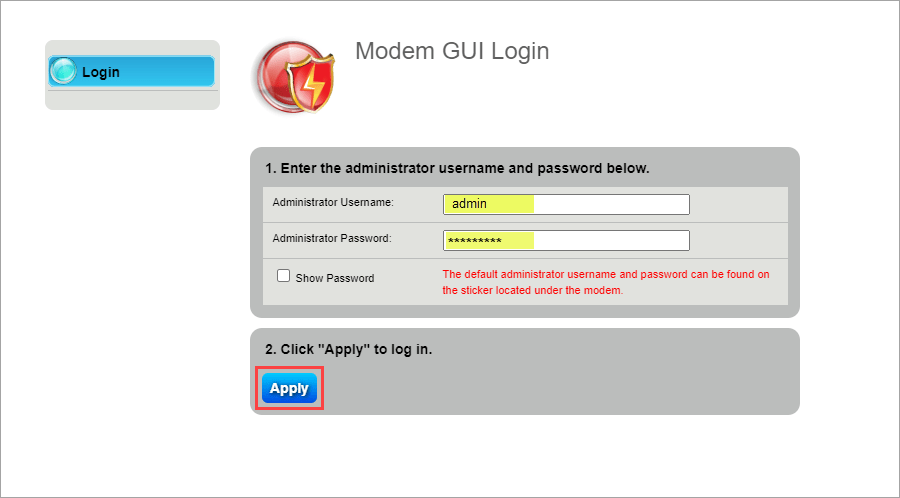
2. Open a web browser and type http://192.168.0.1 into the web address field.
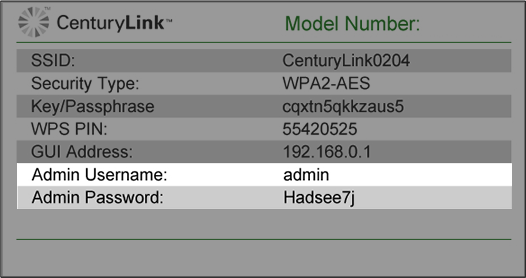
3. Sign in to the modem settings (GUI) using your Admin Username and Admin Password, printed on the sticker.
You can find the Admin Username and Password printed on the sticker attached to the side, back or bottom of the modem.
CAUTION!Do not remove your modem sticker. It includes your default Admin Username and Admin Password, which cannot be retrieved if lost. Your modem could become unusable without them.
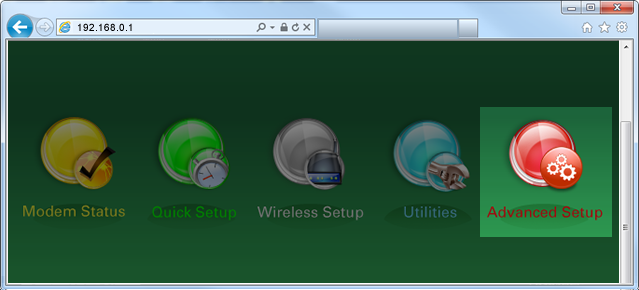
4. Select Advanced Setup in the main menu.
Advanced setup menu options
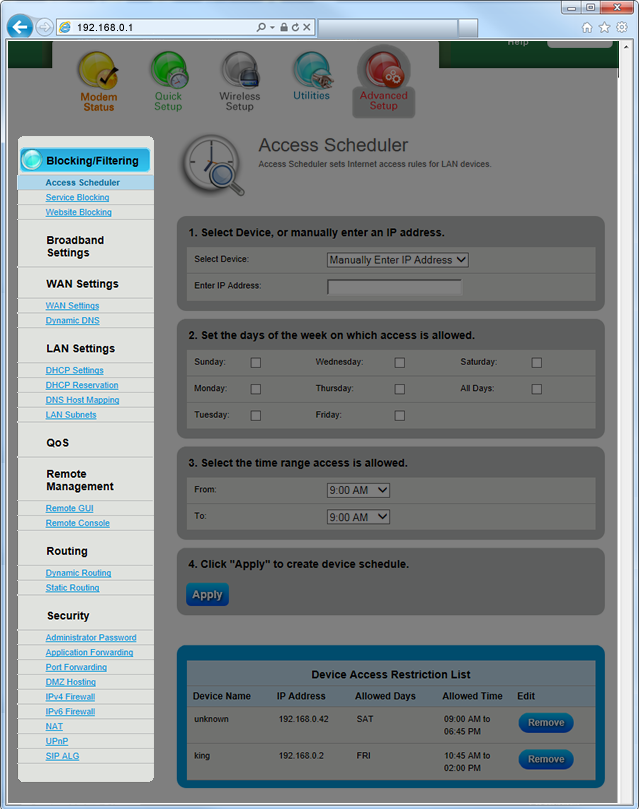
Select a menu option from the left sidebar. The full menu of options is listed below, with links to find step-by-step instructions for each setting.
Blocking/filtering
Blocking and scheduling options are not available on modems with Secure WiFi.
Access Scheduler: Set internet access times for a device connected to your network.
Service Blocking: Block specific internet services from a device connected to your network.
Website Blocking: Block a device from accessing certain websites.
Broadband Settings: Change the connection parameters to your service provider. These settings should not be changed unless instructed by your ISP.
WAN settings
WAN Settings: Change the protocol and addressing type required by your ISP for internet access. These settings should not be changed unless instructed by your ISP.
Turn on IPv6: IPv6 is an upgrade of IPv4, the protocol that the internet runs on.
Dynamic DNS: Associates the WAN IP address of your router with a hostname.
LAN settings
DHCP Settings: Edit the DHCP settings that define the LAN addressing parameters for your modem to allocate IP addresses to LAN devices.
DHCP Reservations: Leases a permanent DHCP allocated address to a client.
DNS Host Mapping: Creates a static hostname for the specified IP address in the DSL router. WAN and LAN IP addresses are supported.
LAN Subnets: Your modem can support multiple LAN subnet settings. Use the DHCP Settings page to configure the default IPv4 subnet.
CBRAS configuration: CBRAS is a specialized CenturyLink remote access server that allows multiple sources of internet traffic (cable, DSL or broadband wireless) to converge in a single network.
Quality of Service (QoS): Prioritizes traffic types (such as VoIP) before standard data traffic. Traffic shaping your network with QoS can increase application performance and prevent your network from becoming overloaded.
Remote management
Remote GUI: Enables access to the router from a WAN connection. To access your modem remotely you will need to use https:// followed by the modem WAN IP address. You can manage the Administrator Username and Password for the modem GUI here.
Remote Console: Enables telnet or SSH access to the router from a WAN connection using the WAN IP address of the modem.
Remote Telnet (for older modems only): Remote Telnet enables "Secure Shell" (SSH) access to your router over a WAN connection using the modem's IP address.
Routing
Dynamic Routing: Used if a gateway is set up behind the modem.
Static Routing: Adds routers manually to the routing table. If a change or a failure occurs between two statically defined nodes, traffic will not be rerouted and must wait for the failure to be resolved by the administrator.
Security
Administrator Password: Prevents outsiders from accessing the firmware settings of the modem. After creating a username and password, you will need to enter them every time you access the modem firmware GUI located at http://192.168.0.1.
Port Forwarding: Allows you to enter ports or port ranges to forward Internet applications to a LAN device.
DMZ Hosting: Enables a LAN device to use the modem WAN IP address as its own. DMZ places the LAN device outside the firewall.
IPv4 Firewall: Activating the firewall is optional. When the firewall is activated, security is enhanced, but some network functionality will be lost.
IPv6 Firewall: Activating the firewall is optional. When the firewall is activated, security is enhanced, but some network functionality will be lost.
Network Address Translantion (NAT): Turning off NAT will open your broadband modem to outside intrusion, creating a security risk. These settings should not be changed unless instructed by your ISP.